Hacking my Air Purifier 🌪️
networking linux hacking iot A while back, I got one of those “smart” air purifiers to sit in my room while I work-from-home. Like a lot of IoT devices, this fan works only with a proprietary app, requires a constant internet connection, and is very chatting to a bunch of domains that resolve to IPs in foreign countries. Below are my ramblings/notes as I try to reverse engineer how the device works, with the goal of getting the “smarts” to work “detached” from the proprietary mobile app and API service.
Setup & Pairing
This device is paired by first opening the proprietary app with the device in pairing mode. Your mobile device temporarily creates an adhoc WiFi network to allow to transfer the credentials of your local 2.4 GHz WiFi network.
‘Man in the Middle’ Network Setup
To do my initial analysis, I needed a simple way to monitor the network traffic both from the mobile app and the IoT device. Below I lay out two paths I went down to accomplish this.
(1) RaspAP
For better visibility into the traffic, I decided to grab a raspberry pi and start an instance of RaspAP to serve as my local wireless network.
The pi had two interfaces:
wlan1a Panda Wifi adaptereth0which is connected is the upstream to internet
I created a wireless network in RaspAP on wlan1 with a random SSID and simple WPA credentials.
Monitor Traffic
with Wireshark
A quick ‘n easy way to monitor traffic flowing through the wlan1 interface was to visualize it with a combo of tcpdump and wireshark. I ran this command on my local machine, forwarding the traffic to a wireshark window on my local machine.
ssh pi@raspberrypi.wo sudo tcpdump -i wlan1 -U -s0 -w - 'not port 22' | wireshark -k -i -
with mitmproxy
To get a bit more insight into the the HTTP(S) traffic (if any), I used mitmproxy.
Some other helpful guides on MITM’ing can be found here and here.
With RaspAP setup, all we need to get it to play nice with mitmproxy is adding two prerouting rules for HTTP and HTTPS traffic.
sudo iptables -t nat -A PREROUTING -i wlan1 -p tcp -m tcp --dport 80 -j REDIRECT --to-ports 8080
sudo iptables -t nat -A PREROUTING -i wlan1 -p tcp -m tcp --dport 443 -j REDIRECT --to-ports 8080
Then run mitmproxy transparently.
mitmproxy --mode transparent
Proxying traffic from my android phone to my laptop, installing a CA cert to decrypt traffic.
Using a raspberry pi with a cheap WiFi antenna capable of being placed into “Monitor Mode”.
Pop it into the right mode with airmon-ng start wlan1.
(2) Airmon-ng
An alternative way to proxy traffic is to use the airmon-ng command to start an interface in monitor mode.
An ifconfig will show that the interface is now renamed to wlan1mon.
...
...
5: wlan1mon: <NO-CARRIER,BROADCAST,MULTICAST,UP> mtu 1500 qdisc mq state DOWN group default qlen 1000
    link/ether 9c:ef:d5:fa:34:8f brd ff:ff:ff:ff:ff:ff
    inet 192.168.1.1/24 brd 192.168.1.255 scope global wlan1mon
Route setup
ifconfig wlan1mon up 192.168.1.1 netmask 255.255.255.0
route add -net 192.168.1.0 netmask 255.255.255.0 gw 192.168.1.1
Provide internet access (optional)
iptables --table nat --append POSTROUTING --out-interface eth0 -j MASQUERADE
iptables --append FORWARD --in-interface wlan1mon -j ACCEPT
echo 1 > /proc/sys/net/ipv4/ip_forward
Hostapd
Hostapd is an alternative method to using RaspAP to spin up a wireless network against the wlan1 interface.
$ sudo hostapd hostapd.conf
hostapd.conf
interface=wlan1mon
ssid=linksys5050
hw_mode=g
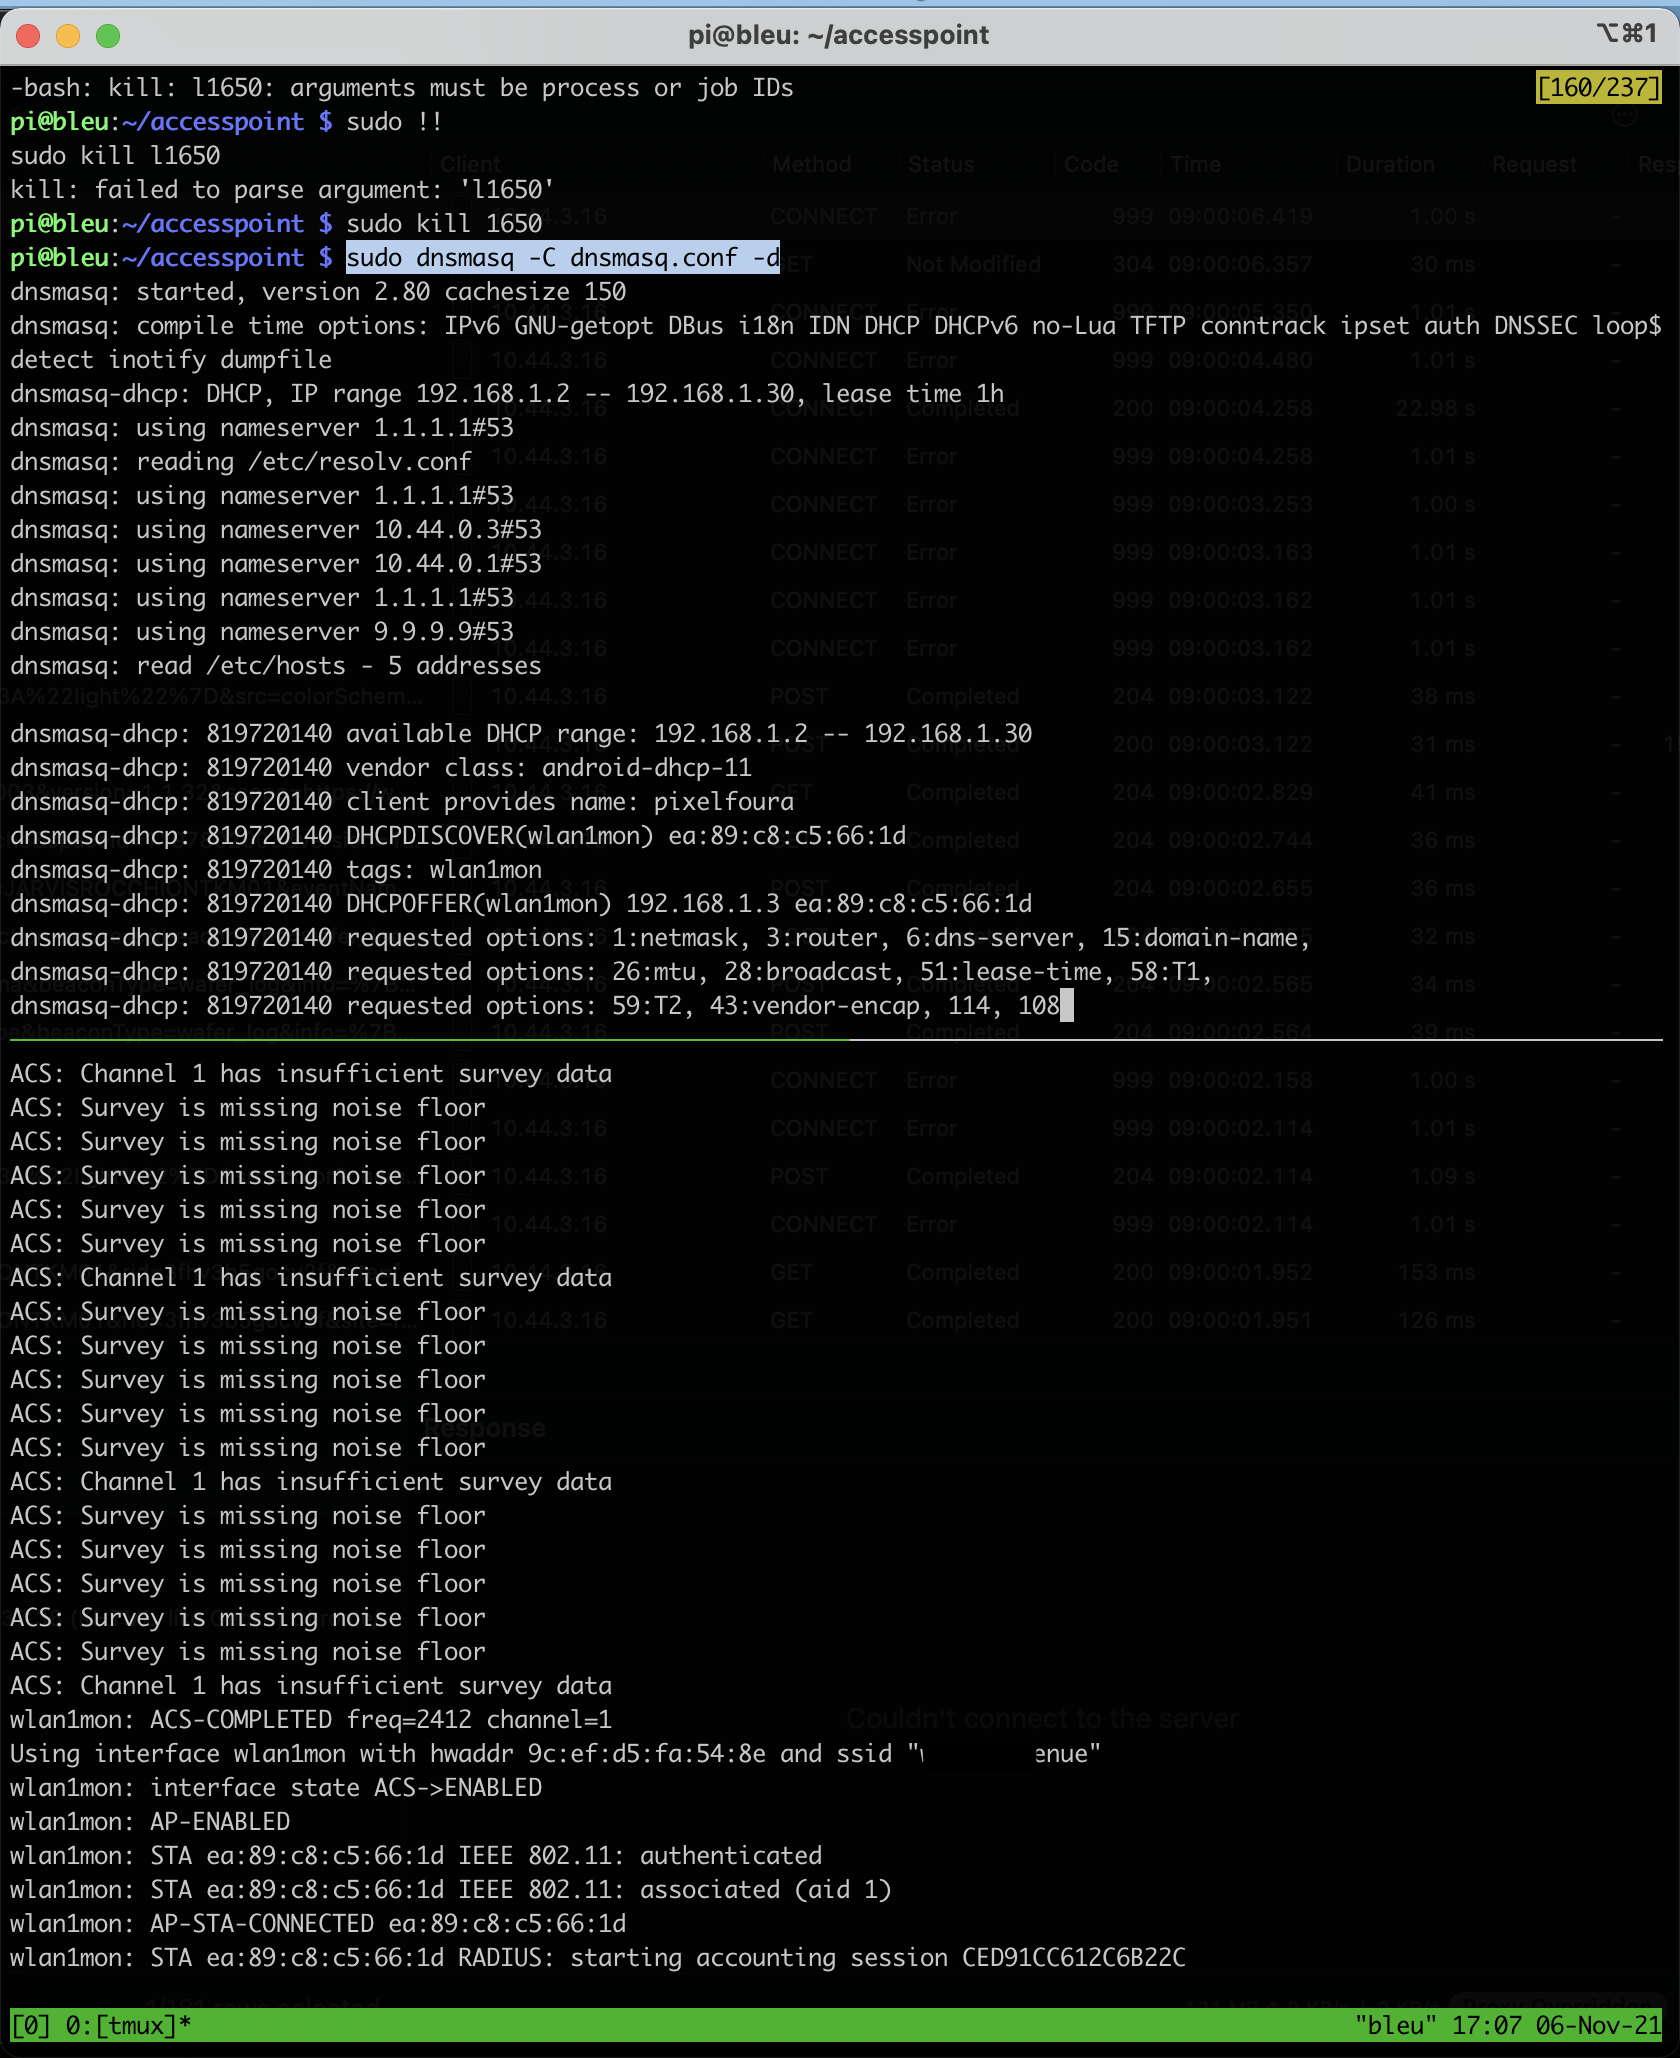
Dnsmasq
This next portion sets up the DNS resolution for us. We won’t get too far if the mobile app or device cannot resolve DNS names.
$ sudo dnsmasq -C dnsmasq.conf -d
dnsmasq.conf
interface=wlan1mon
dhcp-range=192.168.1.2, 192.168.1.30, 255.255.255.0, 1h
dhcp-option=3, 192.168.1.1
dhcp-option=6, 192.168.1.1
server=1.1.1.1
log-queries
log-dhcp
listen-address=127.0.0.1
Getting these running in a tmux session looks something like this. If you’re quick, you can catch all the DNS requests devices on your network send and information on the handshakes between your access point pi and the clients attempting to connect.
Mobile app analysis
Frida
The mobile app pins SSL certificate and fails to open if it detects its traffic is being proxied. We’ve already explored on this blog how to circumvent ssl pinning using a Frida script.
The output below are all of the certificates that were being pinned by the TrustManagerImpl. This seems like an interesting way to enumerate valuable domains early on in an engagement.
Obviously the two most interesting ones here are iocareapp.coway.com and the cloudfront subdomain.
[+] Bypassing TrustManagerImpl (Android > 7) graph.facebook.com
[+] Bypassing TrustManagerImpl (Android > 7) graph.facebook.com
[+] Bypassing TrustManagerImpl (Android > 7) iocareapp.coway.com
[+] Bypassing TrustManagerImpl (Android > 7) iocareapp.coway.com
[+] Bypassing TrustManagerImpl (Android > 7) firebase-settings.crashlytics.com
[+] Bypassing TrustManagerImpl (Android > 7) iocareapp.coway.com
[+] Bypassing TrustManagerImpl (Android > 7) iocareapp.coway.com
[+] Bypassing TrustManagerImpl (Android > 7) maps.googleapis.com
[+] Bypassing TrustManagerImpl (Android > 7) d5zuhet69bkhw.cloudfront.net
[+] Bypassing TrustManagerImpl (Android > 7) maps.googleapis.com
[+] Bypassing TrustManagerImpl (Android > 7) d5zuhet69bkhw.cloudfront.net
A nice command is to know if how to get the list of packages:
adb shell pm list packages -3 -f
This lets you find the app you care about proxying a bit faster.
Recon
At this point I had performed the initial wireless setup on the mobile app. The device was now sending its first ARP to get itself known on our litle network.

Additionally, I was now able to see traffic flowing to the https://iocareapp.coway.com/bizmob.iocare/* from the mobile app.
The JSON payloads contained access tokens that I was able to read through my proxying.
 {
  "body": {
    "unreadYN": "N"
  },
  "header": {
    "accessToken": "<...some jwt...>",
    "error_code": "",
    "error_text": "",
    "info_text": "",
    "login_session_id": "",
    "message_version": "",
    "refreshToken": "<...some jwt ...>",
    "result": true,
    "trcode": "CWIG1004"
  }
}
It appeared there was verification of some sort going on between app and service, specifically with the route https://iocareapp.coway.com/bizmob.iocare/CWIZ0010.json
Request
{
  "header": {
    "login_session_id": "",
    "trcode": "CWIZ0010",
    "message_version": "1.0.1",
    "result": true,
    "error_code": "",
    "error_text": "",
    "info_text": "",
    "is_cryption": false
  },
  "body": {
    "appbuildversion": 62,
    "appminorversion": 3,
    "appmajorversion": 2,
    "verificationCode": "<..some code...>",
    "appKey": "<... some key ...>",
    "langCd": "en"
  }
}
Response
{
  "body": {
    "result": "<..some result..>"
  },
  "header": {
    "accessToken": null,
    "error_code": "",
    "error_text": "",
    "info_text": "",
    "login_session_id": "",
    "message_version": "1.0.1",
    "refreshToken": null,
    "result": true,
    "trcode": "CWIZ0010"
  }
}
This entire API has been reverse-engineered and documented in the homebridge-airmega HomeBridge extension. At this point, I was most interested in cutting out the coway AWS service entirely and controlling the air purifier without relying on the provided web service.
Spoofing DNS
At setup when the air purifier device is provided wireless credentials, it does a DNS request to find the Coway server that it should continue communicate with.
My idea here was to spoof the DNS response to return an IP address to the device that I controlled. Turns out I hadn’t been the first one to think of this - here is a great post by a guy named Robert.
My goal was to listen for this DNS request:
7094 1093.268754 10.77.0.219 1.1.1.1 DNS 80 Standard query 0x0000 A airusf5o.coway.co.kr
And return my own IP address in the A record answer, instead of the real response:
7095 1093.690873 1.1.1.1 10.77.0.219 DNS 184 Standard query response 0x0000 A airusf5o.coway.co.kr CNAME elb-plicegw-01-1801026241.ap-northeast-2.elb.amazonaws.com A 3.36.253.214 A 52.79.160.61
Unplugging and replugging the device also causes DNS request and handshake to reset. Using fake_dns_server.py from Robert’s build a TCP proxy repo, I can trick the device into handshake with a service I control. I wasn’t sure if this was entirely useful or not, but it was certainly interesting to me.
Below is a wireshark capture of the the normal DNS request.

Here is the captured DNS request being spoofed.

The spoofed DNS response from your DNS proxy server in wireshark.

It worked!
Examining the SSL-encrypted traffic
Now, from the perspective of the air purifier device we are the web service that it is programmed to take orders from.
The air purifier immediately tries to start an SSL handshake with (what it thinks is) elb-plicegw-01-1801026241.ap-northeast-2.elb.amazonaws.com:9090.
- Trying to connect to this service with
opensslprovides a bit of insight into what we need to emulate in our own service -
josh@scarlett ~ % openssl s_client -connect elb-plicegw-01-1801026241.ap-northeast-2.elb.amazonaws.com:9090
CONNECTED(00000006)
depth=0 C = KR, ST = Seoul, L = Seoul, O = COWAY, OU = SW Dev Unit, CN = Coway_iTrust
verify error:num=18:self signed certificate
verify return:1
depth=0 C = KR, ST = Seoul, L = Seoul, O = COWAY, OU = SW Dev Unit, CN = Coway_iTrust
verify return:1
---
Certificate chain
 0 s:/C=KR/ST=Seoul/L=Seoul/O=COWAY/OU=SW Dev Unit/CN=Coway_iTrust
   i:/C=KR/ST=Seoul/L=Seoul/O=COWAY/OU=SW Dev Unit/CN=Coway_iTrust
---
Server certificate
-----BEGIN CERTIFICATE-----
MIIDUDCCAjgCCQDmeYKQthhzNTANBgkqhkiG9w0BAQUFADBqMQswCQYDVQQGEwJL
UjEOMAwGA1UECAwFU2VvdWwxDjAMBgNVBAcMBVNlb3VsMQ4wDAYDVQQKDAVDT1dB
WTEUMBIGA1UECwwLU1cgRGV2IFVuaXQxFTATBgNVBAMMDENvd2F5X2lUcnVzdDAe
Fw0xOTA4MDUwNzUyMzBaFw00OTA3MjgwNzUyMzBaMGoxCzAJBgNVBAYTAktSMQ4w
DAYDVQQIDAVTZW91bDEOMAwGA1UEBwwFU2VvdWwxDjAMBgNVBAoMBUNPV0FZMRQw
EgYDVQQLDAtTVyBEZXYgVW5pdDEVMBMGA1UEAwwMQ293YXlfaVRydXN0MIIBIjAN
BgkqhkiG9w0BAQEFAAOCAQ8AMIIBCgKCAQEAuun9gietTB7+9kK76Y8gRf4n+c6I
s6gDyWMcWLXB7Ru3ExBzdVST8QFSI6g7gSA+GNVjsKko82qZFp63u5iFtWuqeXqw
/sHGwxtvVmMu7Bjzxb6cf4xNTLL8U44TmAvSVj0d7GrtbZ9zOuNkJC8IePINn+Oa
dDrVrTpKERnZSSYiO40ZZdX1Jgewvh8VDBI2rENvoNvuOxPKuXU3iXuYx8oqnTzX
f+2ELI9Rs/ZF6io3pKTzoWG5vX5mcgnKfHqJSU5Vrdtj8V28R4h7sLLQVI4txLcy
+bEY2zrCQ6jeacJUZCKTePZ6QSYIHslwlD1hfYdJNywDhwqeN6eVSZWhdwIDAQAB
MA0GCSqGSIb3DQEBBQUAA4IBAQB96CzdRx8IGgyfO2j4GAEpZEEjg7MGhCIn5ie/
PME5Sw6C7e+u/L/yN92L1kofZovWAX/KvGcODdCUVrm6ten70OaAqaEQylcQWjru
iUPjhIod2HCn9P7OALgyVR229YHN2PBnoqytiUtcbG5ka5fJYozjzRrv+bMQOHw+
8rXNPgU7gX9fD1zBMOls7dI0fzMNb7Tdjc0ai3CgskXV2xt7MzRHEzSbJANdbPUP
9mhQpqwmxc07ngXmObmoO+MDttKPZUZvEBrZuIqFQ3dln0zNwDOZrLqKNpTQM/I2
fqzQfBJ+wKiZpklUiruqMczFAjxBaJxpFdWy9IkyYKepxU1d
-----END CERTIFICATE-----
subject=/C=KR/ST=Seoul/L=Seoul/O=COWAY/OU=SW Dev Unit/CN=Coway_iTrust
issuer=/C=KR/ST=Seoul/L=Seoul/O=COWAY/OU=SW Dev Unit/CN=Coway_iTrust
---
No client certificate CA names sent
Server Temp Key: ECDH, P-256, 256 bits
---
SSL handshake has read 1392 bytes and written 378 bytes
---
New, TLSv1/SSLv3, Cipher is ECDHE-RSA-AES256-SHA384
Server public key is 2048 bit
Secure Renegotiation IS supported
Compression: NONE
Expansion: NONE
No ALPN negotiated
SSL-Session:
Protocol  : TLSv1.2
Cipher    : ECDHE-RSA-AES256-SHA384
Session-ID: 61ED89AA6B8CB51F579C352A74ED5CB179A471E4185F822A0E882EF2FABD919C
Session-ID-ctx:
Master-Key: 1A87189FD0368E48BFDE15F21F0BBBD4147CC7DADF296E5FB6A342B2A73412C980C673E3DE2DEBF7C6DBC4D142971AF8
Start Time: 1642957226
Timeout   : 7200 (sec)
Verify return code: 18 (self signed certificate)
---
Emulate real service
I took a look at this guide in Debugging SSL communications to figure out my next steps.
It seemed that I needed to pretend to be some service that accepted a TLS connection over port 9090.

My fist attempt was using “Ghost Tunnel”.
nc -l localhost 12345
./ghostunnel server \
    --listen 0.0.0.0:9090 \
    --target localhost:12345 \
    --keystore test-keys/server-keystore.p12 \
    --cacert test-keys/cacert.pem \
    --allow-all
[20027] 2022/01/17 21:55:03.899372 starting ghostunnel in server mode
[20027] 2022/01/17 21:55:03.900047 using keystore file on disk as certificate source
[20027] 2022/01/17 21:55:03.929614 using target address localhost:12345
[20027] 2022/01/17 21:55:03.929871 listening for connections on 0.0.0.0:9090
[20027] 2022/01/17 21:55:55.228107 error on TLS handshake from 10.77.0.219:58860: tls: client offered only unsupported versions: [301]
But turned out, I needed to support legacy TLSv1.0 - so Hitch, which allows for older TLS version on host’s openSSL install. [1] [2].
hitch --backend [127.0.0.1]:12345 --frontend [*]:9090 --ciphers ECDHE-ECDSA-AES128-GCM-SHA256:ECDHE-RSA-AES128-GCM-SHA256:ECDHE-EC
DSA-AES256-GCM-SHA384:ECDHE-RSA-AES256-GCM-SHA384:ECDHE-ECDSA-CHACHA20-POLY1305:ECDHE-RSA-CHACHA20-POLY1305:DHE-RSA-AES128-GCM-SHA256:DHE-RSA-AES256-GCM-SHA384:DHE-RSA
-CHACHA20-POLY1305:ECDHE-ECDSA-AES128-SHA256:ECDHE-RSA-AES128-SHA256:ECDHE-ECDSA-AES128-SHA:ECDHE-RSA-AES128-SHA:ECDHE-ECDSA-AES256-SHA384:ECDHE-RSA-AES256-SHA384:ECDH
E-ECDSA-AES256-SHA:ECDHE-RSA-AES256-SHA:DHE-RSA-AES128-SHA256:DHE-RSA-AES256-SHA256:AES128-GCM-SHA256:AES256-GCM-SHA384:AES128-SHA256:AES256-SHA256:AES128-SHA:AES256-S
HA:DES-CBC3-SHA --tls-protos TLSv1.2,TLSv1.0,TLSv1.1 example.pem
example.pem is a self-signed cert with the same common name as the canonical domain name (the AWS Elastic Load Balancer we saw above) - so no sophisticated SSL pinning on the device.
openssl req -newkey rsa:2048 -sha256 -keyout example.com.key -nodes -x509 -days 365 -out example.crt

cat example.com.key example.crt > example.pem
Now, with the hitch backend process serving as our HTTPS frontend on the “external” port 9090 and forwarding the unencrypted traffic to port 12345, we can test it out end to end and see if we can decrypt any traffic the air purifier is trying to send to its server.
pi@raspberrypi:~/ghosttunnel $ nc -lp 12345


010141102<.....>MV0.0.0.13AB
Looking on a back of the unit, a large portion of this string matches the listed serial number 👌.
We are successfully decrypting and capturing traffic that the device is intending to send to its service (by tricking the device into thinking we are that service during the DNS resolution and SSL handshake!).
Next Steps
The next step is to figure out what we want to send to the air purifier. Presumably, once in this state, the device will follow any command we send it - the trouble is to figure out what to send it. If anyone has gotten farther than this - please send me an email and let me know!
Additional Resources
Have a comment? Join the discussion
This post helpful? Buy me a coffee!