Rooting your Bootlocked Pixel Phone (Verizon Edition)
hacking mobile-dev I bought a new Pixel phone on Ebay a couple months ago for testing an Android app i’m developing. To my surprise,
the phone I received in the mail was not the unlocked Google version I thought I ordered (with an unlocked bootloader), but rather the locked down
Verizon version.
I was hoping to eventually root the device in order to play around with some pentesting tools (specifically Frida). Sadly, I wasn’t able
to find an easy solution until now.
Unlock Bootloader
This morning I saw a post on the xda forums by user burduli,
illustrating how he unlocked the bootloader on a Verizon Pixel. His article was posted on May 27th, 2018. It’s taken almost two years since the phone’s release for this simple bootloader workaround to be found!
The steps are as follows, adapted slightly based on my experience and environment (Ubuntu):
- Remove Google account and PIN/Fingerprint from your device.
- Eject sim card from your device.
- Factory reset your device. Skip everything in the setup wizard.
- Go to Developer Options and enable USB debugging.
- Connect your phone to computer.
- Open terminal in adb directory and type
adb shell pm uninstall --user 0 com.android.phone - Restart your device.
- Connect to WiFi, open Chrome and go to any website. (nobody knows why we do this??)
- Go to Developer Options and enable OEM unlocking.
- Reboot into bootloader and via terminal run
fastboot oem unlockorfastboot flashing unlock - Profit
Notes
- For
adbandfastboot, I installed Android Studio on my machine and navigated to~/Android/Sdk/platform-toolswhen I wanted to use those programs. I had difficulty with thefastbootinstalled from apt that was attached to my PATH. - I had to restart my phone twice to perform step 9. The first time, the OEM unlocking slider was grayed out. Others in the original post’s comments had similar problems.
- If you see the error “insufficient permissions for device error”, you’ll need to first kill the server
adb kill-server, and then restart with root privssudo adb start-server. - Be aware that unlocking bootloader removes everything from your device. The fact that you factory restore in step 3 means you should be ok with this…
Rooting Prereqs
These are the requirements and files I found necessary.
adbandfastboot(which you already have from the bootloader bit above)- A cable to connect phone to computer
- “SailFish” Pixel Factory Image v8.1-May (downloaded to host computer)
- twrp-3.2.1-2-sailfish.img (downloaded to host computer)
- twrp-pixel-installer-sailfish-3.2.1-2.zip (downloaded to device file system BEFORE starting)
- Magisk (downloaded to device file system BEFORE starting)
Get rid of all the Verizon
Now i’m not positive if this step is essential, but after encountering difficulty I decided to reimage the phone with an official Google
image. Either way, can’t hurt to start with a clean slate.
Download the image above and follow this steps Google provides on their factory images page.
Essentially, you’ll want to unzip the image archive, plug in your device, and run the flash-all.sh it provides. You’ll need to make sure the
correct fastboot is in your PATH. Mine wasn’t, so I modified the four spots that fastboot was called in the script and wrote out the full path (~/Android/Sdk/platform-tools/fastboot).
Prep TWRP
First off, make sure to set a PIN number in the OS before continuing. You need a PIN so TWRP can decrypt and access the file system later.
I had no idea what TWRP was before this guide, but apparently it’s a custom recovery tool used for installing custom software on your device. The way we
install TWRP is by first loading a temporary TWRP state onto the device, and then in that state overwriting our recovery partition with a full TWRP install.
Install the .img file from above, move it to your platform-tools folder and rename it to twrp.img.
mv ~/Downloads/twrp-3.2.1-2-sailfish.img ~/Android/Sdk/platform-tools/twrp.img
Load TWRP
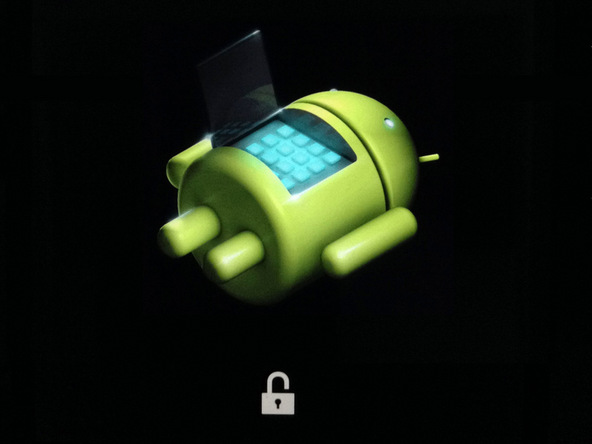
Now we’re ready to load TWRP onto our phone. Start bootloader mode by holding down power button + volume down and plug in your phone. If you see an Android lying on his back, you’re in the right spot. Try running fastboot devices - you should see your device show up.
Boot from the twrp image we just moved to the platform-tools directory by issuing:
fastboot boot twrp.img
Install TWRP
Great! You should now be booted into the twrp interface.
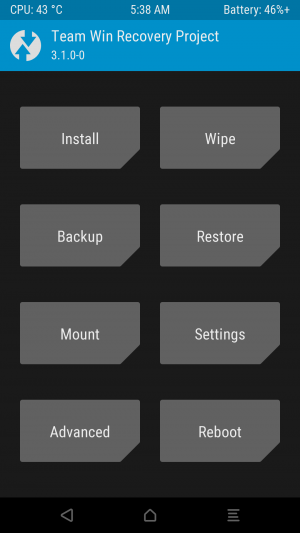
Press the “install” button, navigate to your Downloads folder, and install the twrp-pixel-installer-sailfish-3.2.1-2.zip you downloaded to your phone earlier. Let that installation complete (hopefully with no errors).
Now go back a few steps to the page we started at, press the restart button, and then press recovery. You should now boot into a version of TWRP running entirely on your device. You can use TWRP to do a whole bunch of things…one of them being rooting the device.
Actually root the device
Same as last time! Press the “install” button, but this time you’re installing the Magisk zip you downloaded at the start of this guide.
Like magic, your device is now rooted! I downloaded a free “Root checker” app from the Play Store to confirm. Enjoy!
Have a comment? Join the discussion
This post helpful? Buy me a coffee!